Monday, March 31, 2014

Spring is Arriving!!

Here I am, after 6 posts on photography, sharing some absolutely terrible pictures of birds - but they're the first returning migrants of the season, so they're important markers of the changing season here in the valley.  Within 24 hours I saw our first robin, first starlings, and first redwing.

Of all the seasonal changes I think spring comes with the clearest markers of change - first migrating birds, first green grass, first flowers, and so on.   The robins and blackbirds are usually the first of all the migrants to arrive (though I don't like in an area for observing waterfowl).  The date I watch for robins is Mar. 10th; this one arrived on Mar. 30th.  When you don't see them you can easily recognize their calls.

At the same time a group of starlings  usually arrives and sits around huddled together in the cold, waiting for the rest of the snow to melt.  But they do help mark the start of spring.

This is the hind end of a redwing blackbird - probably the worst picture I've ever posted on this blog.  But try to put yourself outdoors where you hear their spring calls, one of the most vibrant signs of spring.  If only he'd turned around...

Still we have lots of snow, though it's now subsiding in the sun fast.  This is a big rock, about 4 feet high in our backyard.  We haven't seen it for 8 weeks, but I like the pattern of the shadows on the snow..

The heavy indestructible plastic adirondack chairs sitting under the old apple tree are emerging; we can actually see the arms of two of the chairs now.

And the snowbanks out front are definitely starting to disintegrate.  The road is bare, and the driveway is almost bare, though saturated and wet at the moment.  Things will take a long time to dry out this year, but I think we've turned the corner.  It hit double digit temperatures today!

I've just squeaked in under the deadline, but I'm glad to join:
http://mylittlehomeandgarden.blogspot.ca/
                                                          for the last time this season.  It's been fun; see you next year.

Sunday, March 30, 2014

Forcing the Shutter Speed

We were on a photo walk 18 months ago when a friend showed us how to photograph waterfalls.  Just as you can move from 'Auto' to 'Aperture' setting, you can also move to 'Shutter' priority.  This is the trick you use to get those beautiful misty pictures of waterfalls like this one.

These are the two pictures I took of Eugenia Falls that day.  I reposted one like this just a week or two ago when I showed the falls totally frozen.  Previously I had always tried to 'stop' the water to get a nice sharp picture (as in the photo below), but once I learned how to slow it down instead, I think it makes a much better picture (as above), and I now try to shoot all waterfalls this way.

To change from what I used to photograph, I set the camera to 'Shutter' mode, and then set the speed down to about 1/8 of a second.  This gives time for the water to move, giving this effect (as in the first photo).  But of course it would also make the rest of the picture all blurry.  So you need either a tripod, or you need to brace yourself against a tree and hold things really still.  I have found I was actually able to shoot all this ones just by bracing myself and holding the camera steady.

Hogg's Falls is probably my favourite, and you've seen this picture or one like it before on this blog.  In doing this, you need to watch for a message that says 'Too Much Light' or 'Too Bright', because 1/8  of a second is a long exposure.  You then need to set the ISO down to its lowest setting - on my camera 100.  That makes the light sensor less sensitive, and hopefully gets you the right exposure. 

I have also played around with exposure compensation as I discussed yesterday, as well as varying the shutter speed somewhat, from as low as 1/4 up to 1/10th. But as I've said before, with digital, you can change settings slightly, and try as many shots as you like.

Here's a final pair of pictures of Inglis Falls in Owen Sound, taken last November.  I think I"ve posted them before too, but they illustrate well the two approaches to taking waterfall shots.  In my mind, a very good reason to move beyond the 'Auto' setting. Which do you prefer?

I have more I want to say about what I've learned about photography, but I'll leave that til later and return to my usual seasonal reports on the valley tomorrow.  I did finally see my first robin today, only 3 weeks later than usual!


Saturday, March 29, 2014

Forcing the Aperture Setting

Once you've moved off 'Auto' to shoot on the 'Aperture' setting, I found I could artificially force the aperture setting to be higher or lower than the camera was telling me.  On my camera this is called 'Exposure Compensation', a small button that I push down and hold, on top of the camera.  I've found it particularly useful for shots involving bright light like snow on sunny days, or sunrises.

First I needed to understand that even though I had moved off 'Auto', the camera was still automatically choosing an exposure once I set the aperture.  In really bright light a camera will shut down the exposure a little (by choosing a faster shutter speed), because it thinks the picture is too bright.  I find I often need to force the aperture open a little to get the sunrise view I want.

 
The first photo above was distinctly too dark, but this one, letting in just a little more light, looks about right to me.  Perhaps slightly exaggerated  orange, but close to what I actually saw.

Pushing the aperture too far makes the photo a little too bright and washed out.  But of course with digital, you can shoot one, look at it, adjust, and shoot another, until you get what looks best to you.  I often end up taking numerous sunrise (or sunset) shots, to get a few I like.  I realize you can adjust exposure in software later, but in my experience trying to do that, you're always better off to get it right in the first place.

The same applies on bright snow in the sun.  In fact this was where I first realized it would be helpful to get beyond the 'Auto' setting - the snow pictures I was getting just weren't capturing the bright white.  This picture is from the ski trip we took in January up to Peninsula Lake.  This shot is on automatic, and is both a little darker and a little bluer than realistic.

In this shot I moved off automatic and forced the aperture open a little more than what the camera was telling me.  This seems much more realistic to me, both the brightness of the snow, and the colour.

The third shot here is just a little too bright, slightly washed out compared to reality.  And if you're wondering what those diagonal tracks are to the left, that's someone 'skate-skiing' for a short distance, instead of using the classic track-set trail I was using.

So if you move onto the Aperture setting on your camera, you can then use Exposure Compensation to experiment with forcing the exposure to be slightly lighter or darker than what the camera wants to tell you, a useful trick in some situations.

Technical Info:

I found yesterday's post particularly hard to write.  It's hard to articulate, even for myself, getting beyond 'Auto' without making it too complex.  But if you're in the same position I was in, trying to do that, there is some technical info that may help.

Shutter speed and aperture are two opposite settings on the camera. Shutter speed is shown on the window of my camera as a fraction, like 1/125; aperture is shown as 'F Stops', like F3.5 or F16.  Trying to understand these in theory just baffles me, but learning how they impact the picture through practice comes easily.  For example, if you take a picture of a scene, 1/125 will normally give a sharp picture, but 1/8 will not; you just can't hold the camera steady enough.  And if you want a picture of something moving quickly, you might want 1/1000 or higher to freeze the action.  This seems like common sense to me.

If the shutter speed is faster, the aperture must be lower to let in enough light; if the shutter speed is slower, the aperture must be higher to avoid over-exposure.  In the Auto setting, the camera balances these.  In Aperture setting, you set the aperture, and the camera choose shutter speed; in Shutter mode, you set the speed and the camera chooses the aperture.  But in all cases the camera still automatically tells you what the exposure should be, using the built-in light meter.  Exposure compensation lets you over-ride the camera a little to make the picture lighter or darker.

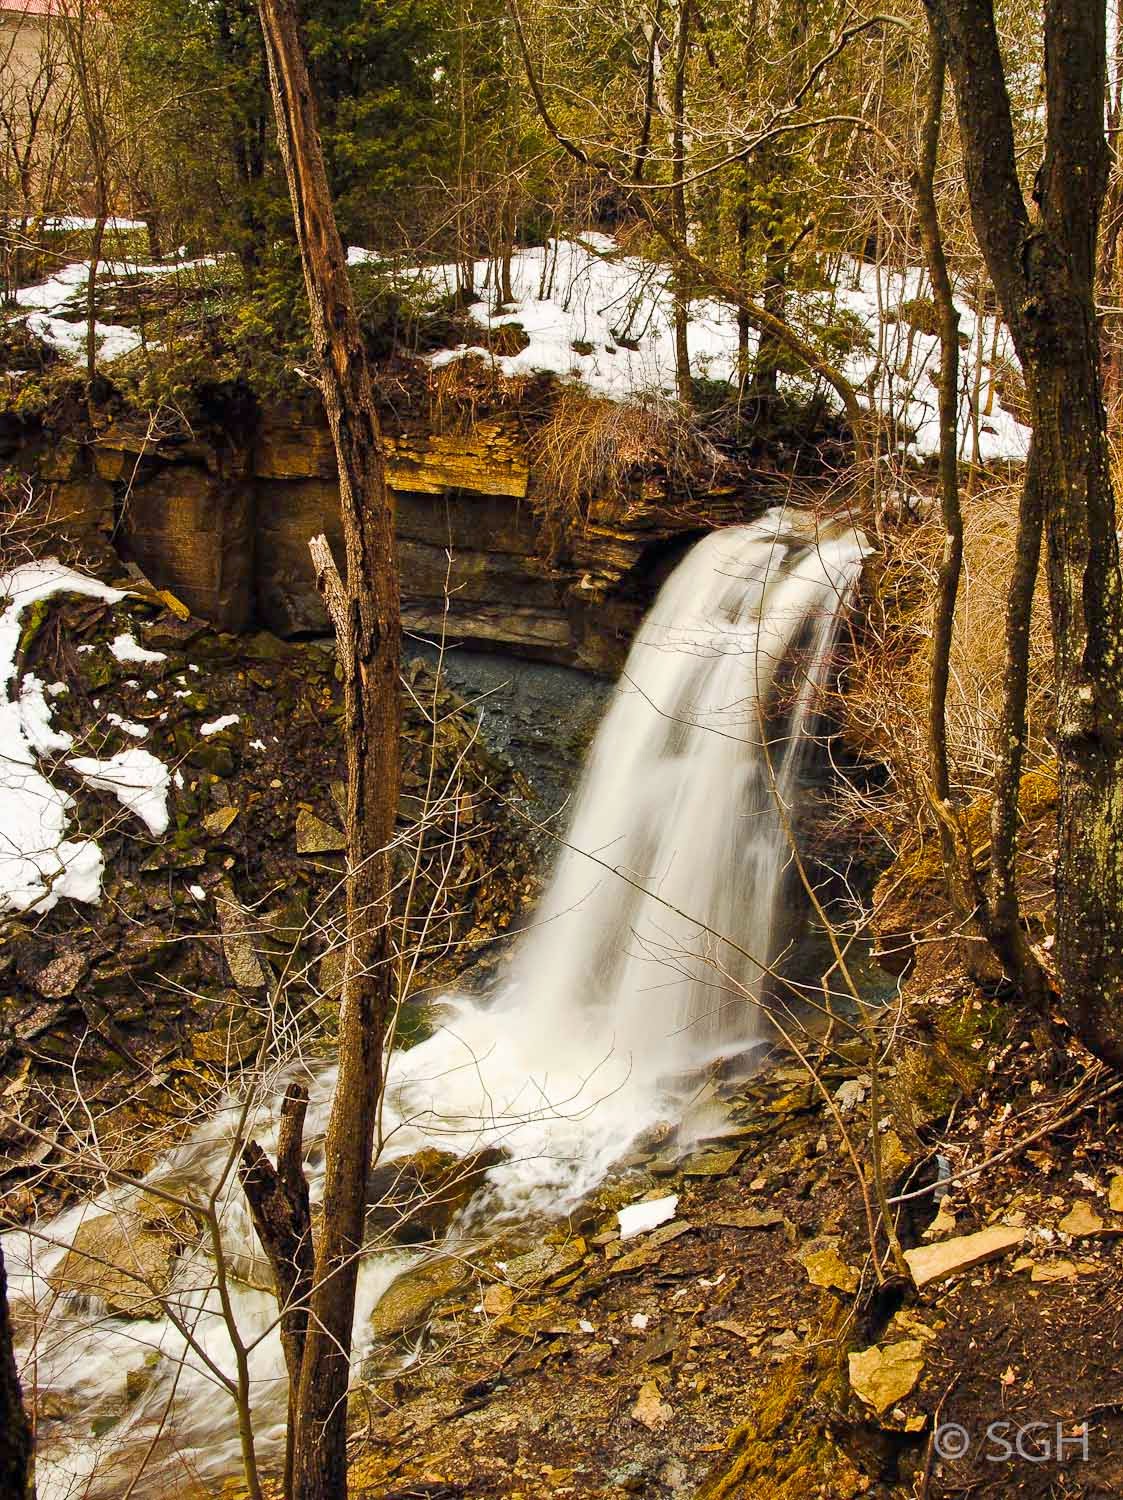
Mid-range settings are usually no problem either way; it's the extremes that cause you to stop and think about the settings more carefully - like photographing waterfalls, which I'll discuss tomorrow.

You might want to know that I use a Nikon DSLR, the lowest most basic model that was available at the time, the D3000; my wife's camera (which I also sometimes use) is a Canon PowerShot, a higher-end point and shoot model.

Friday, March 28, 2014

Getting Beyond the 'Auto' Setting

On my old film camera I used for many years you could only adjust three things - aperture (the amount of light coming in), shutter speed (how quickly the shutter opens and closes), and ISO (the sensitivity of the film).  That last adjustment could only be made by buying different film, so it didn't get made very often!


Kinnisis (Detail) by Bill Lishman

In comparison, I'm told you can adjust 64 things on a typical digital camera, simultaneously!  My mind simply can't cope with that many possibilities.  But when my wife chose to go to Haliburton School of the Arts for a week for a quilting workshop, I signed up for a travel writing and photography workshop.  One of the best things I've ever done!  This post is illustrated with photos taken during our week there.

 Haliburton School of the Arts

Our instructor cut through all the possibilities by suggesting that we think of three simple things - shoot in the  'Aperture' setting,  and adjust the ISO and the white balance.  Now my mind can cope with three things, and I found switching to Aperture instead of Auto was easy.  In most typical light situations you just keep shooting as if you were on Auto - but you can adjust that aperture, or the shutter speed, when you need to.

Redwing Frond by Darlene Bolahood

What you do have to do when shooting in Aperture mode is keep an eye on what your camera is telling you, to make sure the camera doesn't choose a shutter speed too slow.  I usually try to shoot outdoors at a speed of 1/125, which ensures a sharp picture.  In normal light this will be fine.  But in darker situations, your camera might set the speed down at 1/2 sec. for example, which is far too slow.  Then you know you have to use a tripod, or else change your aperture setting to let in more light and allow the shutter speed to be faster.

Park Bench and Sprinkler in Morning Light

But the beauty of digital is that you can experiment, and just shoot in different settings all you want until you see what works.  I still shoot multiple pictures to get what I want; I just need to learn to delete the others!

Of the three things he told us, I still don't understand the white balance, and often forget to set it.  But if you're shooting indoors especially, it does make a difference.  The shot above was taken when our instructor insisted we come out to practice photos just after sunrise, in the 'Golden Hour' for photography.  And as you can tell by the first three pictures above, the school has a great outdoor sculpture collection.

 
But I did learn to change the ISO setting when needed, especially if I'm trying to shoot pictures indoors without a flash, as in churches or museums (where it's allowed).  Most of the time I leave it set at 200 or 400, but indoors I crank it up to 1600, and I can get a picture without a flash if I really steady myself carefully.  This indoor picture of teenagers learning fencing is an example.  The school cleverly runs classes for teenagers so a parent can come for a week and keep their teenager busy too!

The other thing about 'Aperture' is how it influences 'depth of field', the depth of your photo that is in focus.  The tree above is only in focus for a narrow band part way up the trunk, as you can see; it has a shallow depth of field.  This is what the camera shot first.

But by stepping back a bit and changing the aperture to a higher setting, I got a much improved depth of field.  I'm not very good at this yet, and this one isn't perfect, but you can see it generally looks in focus for quite a bit up the trunk, and is a much better picture.

So if you've been shooting on 'Auto', and occasionally finding your photos just aren't what you want, as I found, you might try shifting to 'Aperture' and starting to learn more settings to give you great pictures instead of just good ones.  I have a long way to go, but my course in Haliburton did get me off the 'Auto' setting.


Thursday, March 27, 2014

Breaking the Rules About LIght

One of the first rules for family snapshots is to have the sun coming over your shoulder, and make sure peoples' faces are in the sun.  Who hasn't tried not to squint in a family photo!  But 'breaking the rules about light' is one of the handiest techniques I use for certain pictures.

Shooting into the light, though perhaps at a bit of an angle so you're not looking straight into the sun, brings out the best in fall leaves.  This is a sumach in our front yard.

Even in the summer, you can show off leaves and flowers by shooting them into the sun.  You just have to find a way to hide the camera's actual lens from being directly in line with the sun so you don't get flaring.

I do this in the winter by simply finding the shadow of a tree trunk.  By positioning the camera so it's in the shadow, I can get a much more interesting picture than shooting the other direction.

The same applied here, though shooting at a bit more of an angle to the sun.  But the frost on the trees shows up wonderfully with the sun sparkling through it.

Sunrises like this one the other day, and sunsets are of course the other time you shoot pictures directly into the sun.  If the sun is below the horizon or behind clouds, you're safe, but otherwise you can get those flares from the sun if you're not careful.  The vertical flare from the sun here was what I actually photographed, not a camera flare.

This was just a lucky shot, on a canoe trip further north several years ago.  The sun wasn't up far enough to reach where I was standing, but was shining through the mist further out on the lake.  I've found by experience though, that you often need to adjust the exposure to get the sunrise or sunset pictures you want.  So tomorrow I'll talk about how I moved off the 'Auto' setting, and learned to set exposures.


Wednesday, March 26, 2014

Learning Photography II

An important point about good photographs that I learned on one of my first photo outings was simply stopping, slowing down, and 'paying attention to composition'.  Our leader actually had us look through little rectangles cut in cardboard to think about how we wanted to compose our pictures.  By trial and error I've learned a lot about what appeals to me as a good picture since.


One thing is to try and shoot your pictures to 'have something in the foreground'.  I think this picture of trilliums with the two flowers up front fairly close works better than any number of photos I've taken of patches of trilliums

And this photo, another of the red barn I shared earlier in the winter, has the tree and fence up front, but also they serve to 'frame the picture'.  This seems to be almost always useful in landscape shots.

This shot of a northern lake, from a canoe trip several years ago, illustrates the 'rule of thirds'.  Try to divide your photo in thirds sometimes rather than always have it symmetrical.  Here the shoreline is approximately the right third of the picture, and the sky is approximately the upper third.  But it's the light of the early morning sunrise that makes it.

 
Stand far enough back from your subject to 'capture the context'.  Here, I wanted a picture of the old mill and dam at Walter's Falls.  But I think it was a lot more effective to shoot from further back and show the millrace, the water flume and some old machinery, than closer.

This picture of the moon rising on that northern lake shown above also shows the 'context' of the shot.  I could have taken a close-up of just the moon, or just the moon and its reflection, but I think the bigger picture, with the canoes in the lower left, illustrates the moment - evening on a canoe trip - much more effectively.  This shot also reminds me to 'be there when the light is right'!

'Try a different viewpoint'.  I've shot hundreds of pictures of big old trees, but a few years ago I tried this viewpoint.  I found it very effective, and often shoot pictures like this now.

And sorry about another snowbank, but it's the only one I can find quickly to illustrate the 'importance of scale'.  Some pictures like this would be meaningless with out an object like the car here, for scale.

Tomorrow, breaking the rules about light.

Tuesday, March 25, 2014

Learning Photography I

Well, it's been snowing again today, and I'm tired of posting pictures of snowbanks and ski trails, so I'm going to try something different.  I'm going to share with you what I've learned and come to think is important about photography over the past two years or so.  I'm doing this partly for myself; I hope articulating what I've learned will help me remember it!  Today, 3 basic principles I've always thought are important.

'Take lots of pictures!'  I've probably taken thousands of pictures of woodlots over the years; frankly most of them turn out to be ordinary.  But every now and then there's one where the lighting and the picture itself is right, and I'm just really pleased.  This is a woodlot along the Bruce Trail, north of us. The more pictures you take, the more you learn, and the better chance of good photos.

At any special event, I find I need to take lots of pictures to get a few that are good.  You can't control the action here, so taking lots gives you a better chance of getting a few that are usable.  I must have shot 50 pictures of the horses at the fair last fall, to get 3 or 4 I thought were really great.

I've just started trying to shoot pictures of bugs of various sorts, with my macro lens, and found it was MUCH more difficult than I thought.  Out of perhaps 500 shots last summer, perhaps 5 were good!  But because with digital you can just delete the extras, and you can try different settings, you learn as you go.

'Be there when the lighting is right'.  Blue skies and sunshine are the best example of this.  All the equipment and technical training in the world won't get you great pictures as easily as just getting out there when the lighting is what you want.  I've recently found this especially true in winter; gray skies and white snow don't say much, but white snow and blue skies look good!

I've also shot thousands of flower pictures, always trying to capture something more than just 'ok'.  Here I shot into the light from a close angle, and I think I got a great picture.  The lighting through these petals gave them a much deeper colour than shooting from the other side with the light - but I was paying attention to the light I wanted.

You won't believe it, but this picture is a 40 year old slide, scanned to create a digital file.  It's along the Bruce Trail on the north end of the Bruce Peninsula.  As you can see, the light made all the difference to the colour in the water here.  And the water really does look like this on a sunny day in June.

'Think about what you're going to use your photos for'.  I tend to do this at the start, and go out taking pictures specifically for the purpose I have in mind - posting here, doing a blurb book, writing articles for local newsletters, or giving talks like the one I'm giving on the Niagara Escarpment in two weeks.  But there are lots of other things you can use photos for too.  You may get to this later on as you see the possibilities, but keeping it in mind gives a purpose to your photography, and gets you out shooting pictures more often.

So before I ever got beyond the automatic setting on my camera, I was improving my photography through these three ideas.  I did eventually get beyond the automatic setting, but that will come in a day or two.  Comments, corrections, and suggestions are welcome with these posts; that's one way to learn!

Monday, March 24, 2014

Another Great Ski!

It's hard to believe we have cross-country skiing at all after the middle of March, but here it is into the official spring season, and there's still great skiing.  My ski buddy and I headed out to the trails at Glenelg Nordic the other day (just before our most recent new foot of snow - trails will be even better now!), and had a wonderful ski under sunny skies.

As I've shared before, most of these trails run through hardwoods, and over quite hilly terrain, so it's great skiing with enough up and down to be exciting.

In a few places the trail runs through a tunnel of planted evergreens, giving lots of variety to your ski.  With moderate temperatures and the sun shining the trails were beginning to get sticky by the time we finished.  I'm glad we went in the morning.

There's only one pond, which gives you a very brief open view along the trails.  We chose the main trail loops which had all been groomed the night before, and the skiing was great in spite of a little ice underneath..

My buddy is waiting patiently for me to catch my breath before we finish off.  He skiis faster than I do, which pushes me to keep up and improve.  I'm slow going uphill, but love the downhill runs.

Don't know if we'll make it back to these trails this year, but it's been the best year ever for cross-country skiing!